
 ClickUp Website
 ClickUp Website
Testuff can seamlessly integrate with your ClickUp account, allowing you to automatically send every reported defect to ClickUp while continuing to manage your manual tests in Testuff.
Configuring Testuff for ClickUp
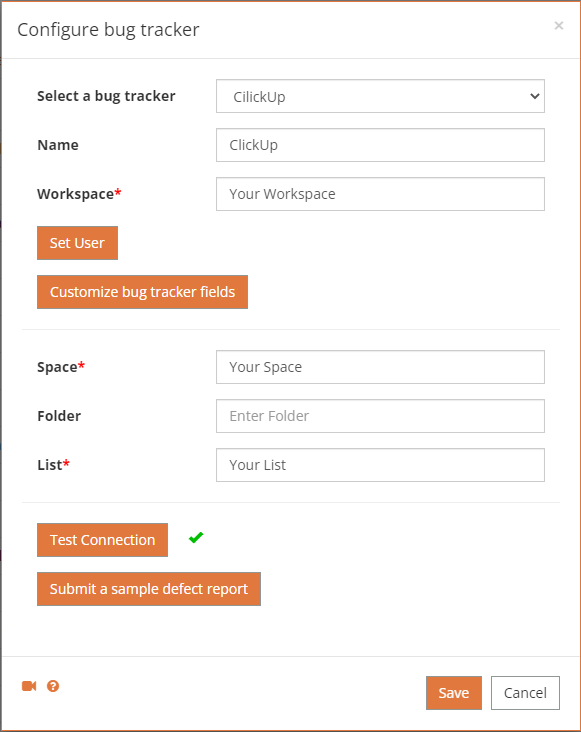
- Access Settings:
- Go to Settings and select the Bug Trackers option.
- The Bug Trackers integration page will display. Click the Add bug tracker link.
- Select ClickUp: From the Select a bug tracker combo box, choose ClickUp.
- Set Default Workspace: Set the Default Workspace. Defects exported from Testuff projects that do not have a custom ClickUp Workspace will be exported using this Workspace.
- Enter ClickUp Token*:
- Click Set user to enter your ClickUp token. In the desktop client, this option is labeled Set my ClickUp user.
- Note the text below the token field. Click the link provided to create your token and approve Testuff.
- After creating the token, paste it back into Testuff.
- Enter Default Values: Enter the default values for your Space and List.
- Test the Connection: Click the Test connection link to verify the correct setup.
- Submit a Sample Defect Report: Optionally, click the Submit sample link to ensure Testuff can create bug reports in ClickUp. If successful, the new bug report will appear in your ClickUp account.
- Save Settings: Don’t forget to click OK to save the settings.
* Creating your ClickUp token directly in ClickUp:
- On any ClickUp page, click your profile icon, then click My Settings.
- On the sidebar, click on Apps.
- Click Generate on the API Token option on top.
- Copy the token and paste it in Testuff, under Set user of the tracker’s setup process.
Associating a Custom ClickUp Workspace with a Testuff Project
You can associate a custom ClickUp Workspace with a specific Testuff project. If a project does not have a custom ClickUp Workspace assigned, it will use the default Workspace set in the general settings.
- Select Project Settings: Go to Settings and select the Projects menu option.
- Click on the Edit link next to the desired project. In the desktop client, access the home screen via the house icon and then click Manage projects.
- Assign ClickUp Workspace: Under the General Settings section (or General tab in the desktop client), ensure the Tracker field is set to ClickUp and fill in the specific Workspace for this Testuff project.
- Save Settings: Click SAVE (or OK in the desktop client) to apply the settings.
For any additional help or questions regarding the integration between Testuff and ClickUp, please contact our support team.