
 OpenProject Website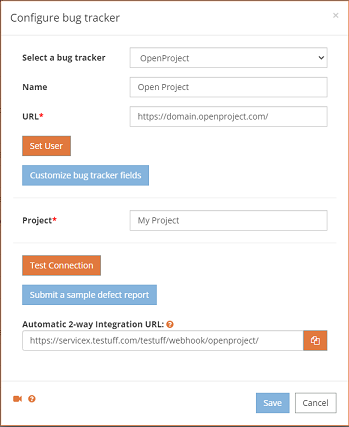
Testuff integrates seamlessly with OpenProject, enabling automatic reporting of defects from Testuff to your OpenProject account. Manage bug tracking in OpenProject while conducting manual tests in Testuff.
How to Configure OpenProject with Testuff
- Access the Bug Tracker Settings: In Testuff, navigate to Settings > Bug Tracker and click the Add Bug Tracker link.
- Select OpenProject: Choose OpenProject from the bug trackers dropdown menu.
- Enter the URL: Input your OpenProject URL.
- Set the Default Project: Define the Default Project. Defects from Testuff projects without a specific OpenProject project assigned will be exported to this default project.
- Set Your OpenProject User: Click Set my OpenProject user and enter your OpenProject API token.
- Test the Connection: Click the Test connection link to verify that the setup is correct.
- Submit a Sample Defect Report: Submit a sample defect report to ensure that Testuff can create bug reports in OpenProject. If successful, the new bug report will be displayed in OpenProject.
- Save the Settings: Click OK to save your settings.
Note: To create your OpenProject API token, go to your OpenProject profile, select My Account, then Access Tokens on the sidebar. Click Generate or Reset, copy the token, and paste it into Testuff.
Setting Up Automatic Two-Way Integration
Testuff supports an industry-unique feature that automatically updates reported defects in Testuff when changes are made in OpenProject. Here’s how to set it up:
- Access Webhook Settings in OpenProject: In OpenProject, click your profile icon, then select Administration.
- Create a New Webhook: On the left side menu, click API and Webhooks and then Webhooks. Add a new webhook by entering the URL found in Testuff under Settings > Bug Trackers > OpenProject (under “Automatic Two-Way Integration URL”).
- Enable Events and Projects: Ensure that the Work package > update event is marked.
- Save the Webhook: Save the webhook settings to complete the integration.
You’re all set to report defects from Testuff to your OpenProject account and receive automatic updates.
Associating an OpenProject Project with a Testuff Project
If you need to export defects from a specific Testuff project to a specific OpenProject project, follow these steps:
- Access Project Settings: In Testuff, go to Settings and click on Projects. Select a project by clicking the Edit link next to it.
- Assign the OpenProject Project: Under the General Settings section, set the Tracker field to OpenProject and enter the corresponding OpenProject project name.
- Save the Settings: Click Save to apply the new settings.
Projects without a custom OpenProject project set will use the default one from the general settings.
Integrating OpenProject Requirements with Testuff
To import your OpenProject requirements into Testuff, follow these steps:
- Set OpenProject as the Requirement Tool: In the Testuff project settings, select OpenProject as your requirement tool.
- Import Requirements: In the Requirements screen, click the More link. From the menu, select Import from OpenProject.
- Enter OpenProject IDs: Enter the OpenProject ID(s) you wish to import, separated by commas.
For additional assistance with integrating Testuff and OpenProject, please contact our support team.