
 Mantis Website
 Mantis Website
How Does Testuff Integrate with Mantis?
Testuff, as a hosted service, seamlessly integrates with your Mantis account, allowing you to automatically send every reported defect to Mantis. This enables you to manage your manual tests within Testuff while continuing to use Mantis for bug tracking.
How Do I Configure Mantis with Testuff?
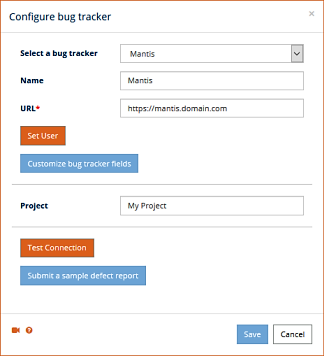
- Access the Bug Trackers Integration:
- In Testuff, go to Settings and select the Bug Trackers menu option.
- Click the Add Bug Tracker link.
- Select and Configure Mantis:
- Choose Mantis from the bug tracker selection combo box.
- Enter the Mantis server address in the URL field, ensuring only the base URL is used (omit any file names after the last slash).
- Set the default Project. Defects from Testuff projects that do not have a specific Mantis project will be exported to this default project.
- Test the Configuration:
- Optionally, click the Submit a Sample Defect Report link to verify Testuff can create bug reports in Mantis. A successful submission will display the new bug report.
- Click the Save button to apply the new settings.
How Do I Add My Custom Fields?
Adding custom fields is simple:
- Click Customize Bug Tracker Fields.
- Select Show Available Custom Fields.
- Choose the fields you wish to add to the Bug Reporter.
Important: The Mantis Category field is often mandatory, so make sure to add it to the bug reporter by checking the Add to Bug Reporter checkbox in the custom fields settings window.
Can I Associate a Custom Mantis Project with a Testuff Project?
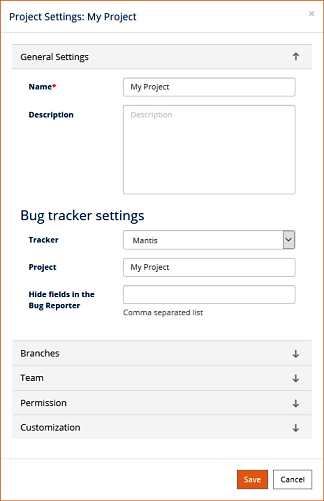
Yes, you can associate a specific Testuff project with a custom Mantis project. If no custom project is set, the default one from the general settings will be used. Follow the steps below to configure it:
- Access the Project Settings:
- Go to the Settings menu and click on the Projects option.
- Select the project to configure by clicking the Edit link next to it.
- Configure the Project:
- In the General Settings section, ensure the Tracker field is set to Mantis and enter the relevant Mantis project name.
- Save the Configuration:
- Click the Save button to register the new settings.
Note: In the desktop client, access this via the Manage Projects link on the home screen and save the settings by clicking OK.
How Do I Export Defects to a Sub-Project?
To export defects to a sub-project, simply use the name of the sub-project. Ensure that the name is unique, as Testuff will select only the first project or sub-project it finds with that name.
For any further assistance with integrating Testuff and Mantis, feel free to contact us.