
 Redmine Website
 Redmine Website
How Does Testuff Integrate with Redmine?
Testuff, as a hosted service, allows you to seamlessly send every reported defect to your Redmine account. This means you can efficiently run manual tests in Testuff while managing your bugs in Redmine.
Setting Up Redmine
To integrate Testuff with Redmine, follow these steps to enable the REST web service:
- Go to Administration > Settings > Authentication in Redmine.
- Check the Enable REST web service checkbox.
- Click Save to apply the changes.
Configuring Redmine with Testuff
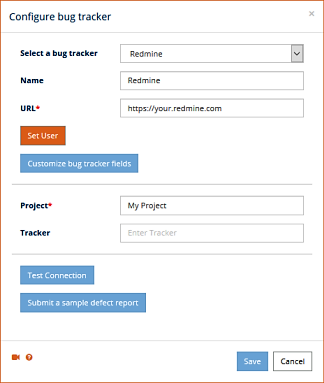
- Open Settings in Testuff and select Bug Trackers.
- Click Add bug tracker and choose Redmine from the dropdown list.
- Enter your Redmine server URL in the URL field, omitting any file names after the last slash.
- Set the Default Project. Defects from Testuff projects without custom Redmine projects will use this by default.
- Enter your Default Tracker, as configured in Redmine.
- To verify the setup, click Submit a sample defect report (web client) or Submit sample (desktop client). If the setup is correct, a new bug report will appear in Redmine.
- Click Save to store your settings.
Setting Up Automatic 2-Way Integration
Testuff can automatically synchronize reported defects with updates made in Redmine. To enable automatic 2-way integration, configure a webhook in your Redmine installation or hosted service.
Hosted Redmine Services (Example: Planio)
The following example uses Planio, but the same webhook configuration applies to other hosted Redmine providers that support webhooks.
- Log in to your Redmine hosting service using an administrator account.
- Open My Account and select Webhooks.
- Click New Webhook.
- Configure the webhook:
- Target URL: Enter the URL provided in Testuff under Settings > Bug Trackers > Redmine (listed as Automatic 2-Way Integration URL).
- Projects: Select the desired project(s) or All Projects.
- Active: Enable the webhook.
- Events / Triggers: Select Issue Updated.
- Secret Key: Leave this field empty.
- Save the webhook.
Self-Hosted Redmine
To enable automatic 2-way integration on a self-hosted Redmine server, you must first install a webhook plugin.
Note: Execute all commands from the Redmine application root directory (for example, /var/www/redmine or /usr/share/redmine). Do not run commands as root—use the Redmine application user (such as www-data or redmine).
-
Navigate to the Redmine root directory and clone the webhook plugin:
Change to the Redmine application root, enter the
pluginsdirectory, and clone the plugin repository:# Navigate to the Redmine root cd /var/www/redmine # Clone the plugin into the plugins folder cd plugins git clone <PLUGIN_GIT_REPOSITORY_URL> <plugin_folder_name> - Follow the plugin’s installation instructions to complete the installation and restart Redmine if required.
- After the plugin is installed, configure a webhook using the same settings described above for hosted Redmine services:
- Target URL: Enter the URL provided in Testuff under Settings > Bug Trackers > Redmine (Automatic 2-Way Integration URL).
- Projects: Select the desired project(s) or All Projects.
- Active: Enable the webhook.
- Events / Triggers: Select Issue Updated.
- Secret Key: Leave this field empty.
Adding Custom Fields to Redmine
To add your custom fields in Redmine to Testuff:
- Go to the New Issue page in Redmine.
- Right-click the page and select View source.
- Search for
issue[custom_field_values][X]to find the custom field codes (replace X with the actual code). - In Testuff, click Customize bug tracker fields (web client) or enter the field information in the Add bug tracker custom fields window (desktop client).
- Input the Name and Code for each field, using the format
X.
Associating a Custom Redmine Project with a Testuff Project
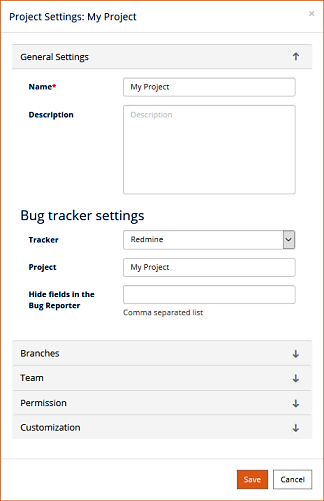
To associate a specific Testuff project with a custom Redmine project:
- Go to the Settings menu in Testuff.
- Select Projects and click Edit next to the desired project.
- In the General Settings section (web client) or General tab (desktop client), ensure the Tracker is set to Redmine, and enter the Redmine project for this Testuff project.
- Click Save (web client) or OK (desktop client) to apply the settings.
For further assistance with Testuff and Redmine integration, please contact our support team.