
 Azure DevOps Website
 Azure DevOps Website
How to Integrate Testuff with Azure DevOps
Testuff integrates seamlessly with Azure DevOps, allowing you to automatically send every reported defect to your Azure DevOps account. This integration supports both cloud-hosted and internally-hosted Azure DevOps servers without requiring any changes to your security or firewall settings.
Configuring Testuff for Azure DevOps
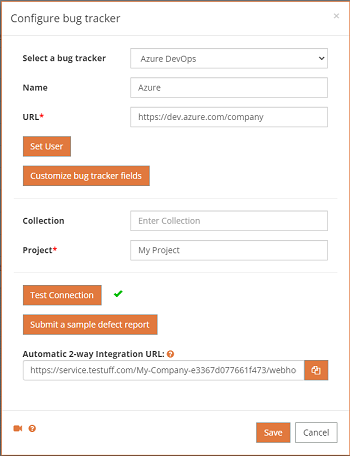
Follow these steps to successfully integrate Testuff with Azure DevOps:
- Access Bug Tracker Settings:
- In Testuff, navigate to Settings.
- Select Bug Trackers from the menu.
- Click on the Add bug tracker link.
- Select Azure DevOps:
- In the list of available bug trackers, choose Azure DevOps from the dropdown menu.
- Enter your Azure DevOps server address in the URL field.
- Set the Default Collection and Default Project fields. If a Testuff project doesn’t have a custom Azure DevOps project assigned, the defects will be exported to this default project.
- Test the Connection:
- Click Test Connection to verify that Testuff can communicate with Azure DevOps.
- Enter your Azure DevOps token, which can be found in the Security section of your personal profile on Azure DevOps.
- Optionally, click Submit sample to create a test bug report in Azure DevOps and verify that it appears correctly.
- Save Your Settings: After confirming the connection, click SAVE to register your configuration settings.
Once saved, the integration will be complete, and you can start exporting defects from Testuff to Azure DevOps.
Setting Up Automatic 2-Way Integration
Testuff offers a unique option to automatically update your reported defects in Testuff with any changes made to them in Azure DevOps. Here’s how to set it up:
- Create a Service Hook in Azure DevOps:
- Choose one of your Azure DevOps projects.
- Go to Project Settings in your Azure DevOps account and select Service hooks.
- Click the Create subscription button, then select Web Hooks from the menu.
- Configure the Service Hook:
- For the Trigger, choose Work item updated, then set the Filters with your preferred values. Click Next.
- Now, you need to enter a URL. Go to Testuff -> Settings -> Bug trackers -> Azure and copy the URL found under Automatic 2-Ways Integration URL.
- Paste the copied URL into the URL field in Azure DevOps. Add your Testuff email and password, and click Test.
- Finish Setup:
- If the test is successful, click Finish. You’re now all set to report defects from Testuff to Azure DevOps and receive automatic update notifications back to Testuff.
- Note that only existing defects in Testuff will be updated when changes are made in Azure DevOps.
Adding Custom Fields
- Access Custom Field Settings:
- Click edit for any field you wish to map, retrieve the available values, and save them. These fields will show up in the Bug Reporter when you report a defect.
- Click on Customize bug tracker fields.
- Map Fields:
- Click edit for any field you wish to map, get the available values and save them. These fields will show up in the Bug Reporter, when you report a defect
- Use the Show available custom fields link to select additional custom fields you wish to add.
Associating a Custom Azure DevOps Project with a Testuff Project
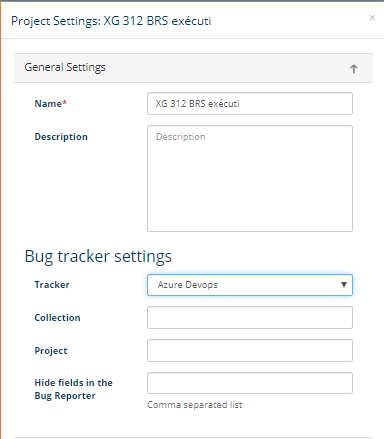
You can link a specific Testuff project with a custom Azure DevOps project by following these steps:
- Select a Testuff Project:
- In Testuff, go to Settings and choose the Projects menu option.
- Select the project by clicking on the Edit link next to it.
- Configure the Bug Tracker:
- Under the General Settings section, ensure the Tracker field is set for Azure DevOps.
- Fill in the relevant Azure DevOps project for this Testuff project.
- Save Your Settings: Click the SAVE button to apply the changes.
Note for Desktop Client Users: The process is similar, but you may need to navigate differently, such as using the “Manage projects” link from the home screen.
For any additional help or questions regarding the integration between Testuff and Azure DevOps, please contact our support team.