
 Axosoft Website
 Axosoft Website
How to Integrate Testuff with Axosoft
Testuff can seamlessly integrate with Axosoft, allowing you to automatically send every reported defect to your Axosoft account. This integration supports both cloud-hosted and internally-hosted Axosoft servers without requiring any changes to your security or firewall settings.
Configuring Testuff for Axosoft
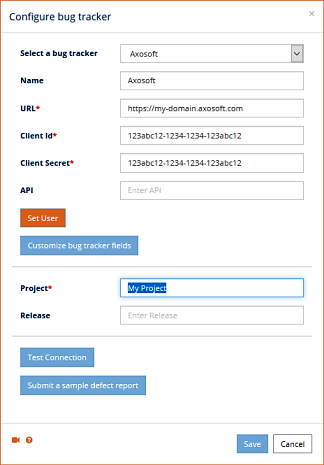
To integrate Testuff with Axosoft, follow these steps:
- Access Bug Tracker Settings:
- Navigate to Settings in Testuff.
- Select the Bug Trackers option.
- Click on the Add bug tracker button.
- Select Axosoft:
- From the list of available bug trackers, choose Axosoft from the dropdown.
- Enter your Axosoft server address in the URL field, excluding any file names after the last slash.
- Input your Axosoft Client ID and Client Secret, which you can retrieve in Axosoft under Tools -> System Options -> Axosoft API Settings -> Manage API Keys. (Note: Only admin users can access these settings.)
- Set the Default Project. Any Testuff project without a custom Axosoft project will use this default for defect exports.
- Submit a Test Defect:
- Click Submit sample to verify that Testuff can send defect reports to Axosoft. If successful, a new bug report should appear in Axosoft.
- Be sure to click SAVE to save your settings.
Adding Custom Fields
You can easily add custom fields to your Axosoft integration:
- Use the Customize Bug Tracker Fields Option:
- Click the Customize bug tracker fields button.
- In the Manage bug tracker fields window, click the Add custom field link and select the fields you wish to add.
- Manual Method (if necessary):
- Go to your Axosoft New Defect page (ensure it’s the page where you enter the new defect fields).
- Right-click on the page and select View source.
- Find the name and code for your Axosoft custom fields.
- Enter them in the Add bug tracker custom fields window in Testuff. Ensure to use customfield_number as the correct code format.
Notes:
- To use the Assigned-to field, the user needs to have the privilege to access the users tree in the security role. Go to Tools -> People -> Security-Roles within your Axosoft, edit the user’s role, and then check the option under administration/users/access-users-tree.
- You can report a defect as a sub-task to an existing Axosoft task by using the Parent_ID predefined field.
Associating a Custom Axosoft Project with a Testuff Project
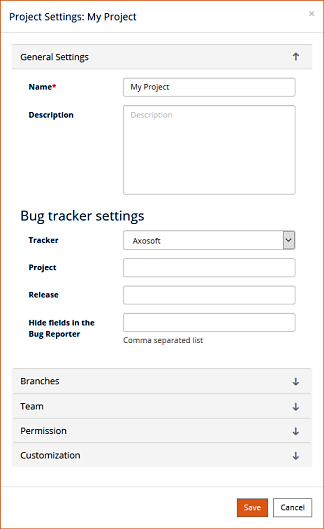
To link a specific Testuff project with a custom Axosoft project, follow these steps:
- Select a Testuff Project:
- In Testuff, go to Settings and choose the Projects menu option.
- Select the project by clicking on the Edit link next to it.
- Configure the Bug Tracker:
- Under the General Settings section, ensure the Tracker field is set for Axosoft.
- Fill in the relevant Axosoft project for this Testuff project.
- Save Your Settings: Click the SAVE button to apply the changes.
Note for Desktop Client Users: The process is similar, but you may need to navigate differently, such as using the “Manage projects” link from the home screen.
For any additional help or questions regarding the integration between Testuff and Axosoft, please contact our support team.