
 FogBugz Website
 FogBugz Website
How to Integrate Testuff with FogBugz
Testuff seamlessly integrates with FogBugz, enabling you to automatically send every reported defect to your FogBugz account. This allows you to run manual tests in Testuff while managing bug tracking in FogBugz.
Configuring Testuff for FogBugz
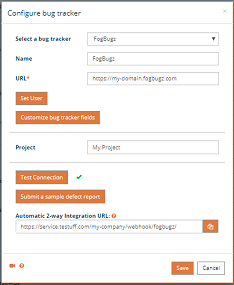
To set up the integration between Testuff and FogBugz, follow these steps:
- Access Bug Tracker Settings:
- Go to Settings in Testuff.
- Select the Bug Trackers option.
- Click on the Add Bug Tracker link.
- Select FogBugz:
- Choose FogBugz from the dropdown list.
- Enter the FogBugz server address in the URL field.
- Set the Default Project: Enter a default project for exported defects, or choose a custom project per Testuff project later.
- Test the Connection: Click Submit a Sample to ensure the integration is working correctly.
- Save Your Settings: Don’t forget to click SAVE (or OK in the desktop client).
Note: Community users cannot be used for this integration.
Enable Two-Way Integration
To set up automatic updates from FogBugz back to Testuff, configure webhooks in FogBugz:
- Set Up a Webhook:
- Go to your FogBugz account and navigate to Webhooks.
- Create a new webhook and check Case Status Changed, CaseEdited, and CaseAssigned.
- Copy the URL from Testuff (under Bug Trackers > FogBugz > Automatic 2-Ways Integration URL) into the webhook configuration in FogBugz.
- Choose POST Method: Set the Hook Type to POST.
Adding Custom Fields
You can add custom fields to the FogBugz defect report in Testuff:
- Customize Bug Tracker Fields:
- In Bug Tracker Settings, click Customize Bug Tracker Fields.
- Select the custom fields you wish to add.
- Manual Custom Fields Setup:
- Right-click and view the source of the FogBugz New Case page to find custom field codes.
- Enter them in Testuff under Add Bug Tracker Custom Fields.
Associating a FogBugz Project with a Testuff Project
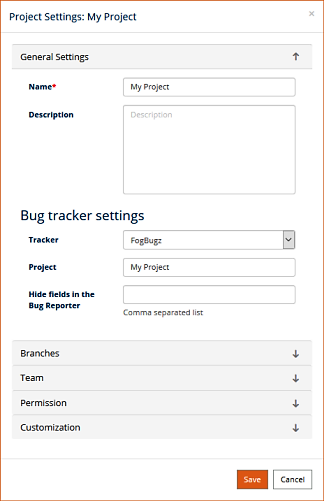
To link specific Testuff projects with corresponding FogBugz projects:
- Select a Testuff Project:
- Go to Settings and choose the Projects menu option.
- Select the project by clicking Edit next to it.
- Configure the Bug Tracker: Under General Settings, set the tracker field to FogBugz and specify the project.
- Save Your Settings: Don’t forget to click SAVE (or OK in the desktop client).
For additional assistance with integrating Testuff with FogBugz, please contact our support team.