
 JIRA Website
 JIRA Website
How Does Testuff Integrate with JIRA?
Testuff, a hosted service, can automatically send every reported defect to your JIRA account, allowing you to manage your manual tests with Testuff while continuing to use JIRA for bug tracking. If you host JIRA on an internal server, the integration process is the same. Testuff’s server does not need to access your bug tracker server, and no changes are required to your security or firewall settings.
How to Configure JIRA with Testuff
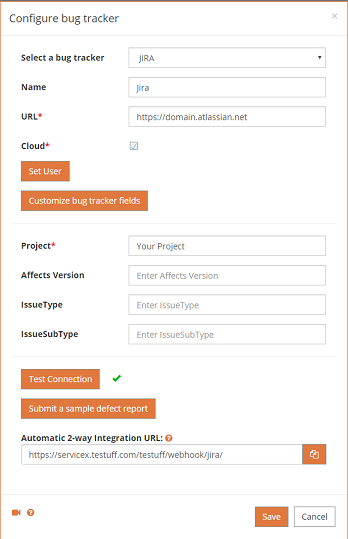
- Access Settings: In Testuff, navigate to Settings and select the Bug Trackers option.
- Add Bug Tracker:
- Click the Add bug tracker link.
- From the drop-down menu, choose JIRA.
- Enter JIRA Server Details: Fill in the JIRA server address in the URL field, ensuring that you omit any file names that appear after the last slash.
- Set Default Project: Specify the default project for JIRA. Defects exported from Testuff projects without a custom JIRA project will be exported using this project name.
- Test the Integration: Click on Test connection. If not previously entered, you will be prompted to input your username and password. For Jira Cloud, use an API token instead of a password.
- How to Obtain an API Token:
- Log in to Atlassian.
- Click Create API token.
- Enter a memorable label and click Create.
- Click Copy to clipboard and paste the token into Testuff as the password.
- Submit Sample Defect Report: Click the Submit sample defect report button to ensure that Testuff can create bug reports in JIRA. A successful report indicates that the integration is working.
- Save Settings: Don’t forget to click Save to register the new settings.
Setting Up Automatic 2-Way Integration
Testuff offers an industry-unique option to automatically update reported defects in Testuff with any changes made to them in JIRA. Here’s how to set it up:
- Create a Webhook in JIRA:
- Go to your JIRA and navigate to Jira Software > Jira Settings > System > Webhooks under the Advanced section.
- Create a Webhook using the URL found in Testuff under Settings > Bug Trackers > JIRA (under “Automatic 2-Ways Integration URL”).
- Final Step: Your setup is complete. Report defects from Testuff to your JIRA account and receive automatic updates.
Note: Only existing defects in Testuff will be updated when changes occur in JIRA.
Adding Custom Fields
To add custom fields:
- Use the Customize Bug Tracker Fields Option:
- Click on the Customize bug tracker fields button.
- Use the Show available custom fields link to select and add the fields you want.
- Manual Addition (if needed):
- Go to your JIRA New Issue page.
- Right-click and select View source.
- Find the name and code for your JIRA custom fields.
- Enter them in Testuff under the Add bug tracker custom fields window, using the correct format, typically
customfield_number.
Note: You can report a defect as a sub-task to an existing JIRA task by using the Parent_ID predefined field and entering the JIRA key (e.g., TES-number).
Associating a Testuff Defect with a JIRA Project
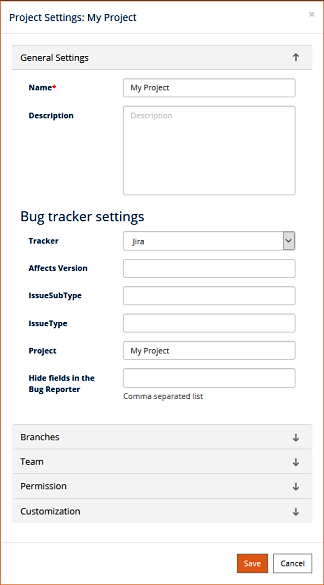
To link a Testuff defect to a specific JIRA project:
- Project-Level Integration:
- Go to the Settings menu and click on Projects.
- Select a project by clicking Edit.
- Under General Settings, ensure the Tracker field is set to JIRA and specify the relevant JIRA project.
- Click Save to apply the settings.
- Reporting-Level Integration:
- Add the Project field to the Bug Reporter from the Settings > Bug Tracker window.
- This allows you to select a JIRA project each time you report a defect.
Troubleshooting Integration Issues
If the integration isn’t working, ensure that your JIRA server accepts remote API calls:
- Enable Remote API Calls:
- Log in to the JIRA web interface.
- Click Administration > General Configuration.
- Scroll to the bottom and click Edit Configuration.
- Under Options, enable Accept remote API calls.
- Click Update.
Handling “Required Field” Errors
If you receive an error about a “required field,” it means JIRA is asking for a mandatory field that Testuff does not have a default parameter for:
- If it’s a Custom Field: Follow the instructions in the Adding Custom Fields section.
- If it’s Not a Custom Field:
- Go to your JIRA New Issue page.
- Right-click and select View source.
- Save the file and send it to our support team. We will add the necessary field defaults and notify you when they are ready.
Integrating Jira Requirements with Testuff
To integrate Jira requirements with Testuff:
- Set Tracker as the Requirement Tool: In the Testuff project settings window, set your tracker as the requirement tool.
- Import Requirements from JIRA:
- From the Requirements screen in Testuff, click on the More link next to the Add requirement button.
- Select Import from Jira.
- Enter a JIRA ID, or multiple IDs separated by commas.
- Alternatively, use JIRA filters to import requirements or defects. Set the filters in JIRA, then enter
filter=FILTER_NAMEorfilter=FILTER_IDin the import dialog in Testuff.
Note: Only JIRA filters marked as “Favorite” by the importing user can be imported.
Testuff-Jira App
For additional options in working with both Testuff and JIRA, read about our unique JIRA marketplace app.
Please contact our support team for further assistance with integrating Testuff and Jira.