
 Assembla Website
 Assembla Website
How to integrate Testuff with Assembla
Testuff can seamlessly integrate with Assembla, allowing you to automatically send every reported defect to your Assembla account. This integration supports both cloud-hosted and internally-hosted Assembla servers without requiring any changes to your security or firewall settings.
Configuring Testuff for Assembla
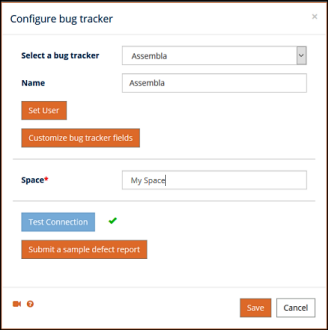
To set up the integration between Testuff and Assembla, follow these steps:
- Access Bug Tracker Settings:
- Go to Settings in Testuff.
- Select the Bug Trackers option.
- Click on the Add bug tracker link.
- Select Assembla:
- From the bug tracker options, choose Assembla from the dropdown list.
- Set the Default Space. Defects exported from Testuff projects that do not have a custom Assembla space will use this space name.
- Submit a Sample Defect:
- Click the Submit sample link to ensure that Testuff can create bug reports in Assembla. If successful, the new bug report should appear in Assembla.
- Don’t forget to click SAVE to register your settings.
- Enter API Credentials:
- You will be asked to enter your Assembla API Key and Key Secret. These can be found in your Assembla account under the user profile in the API applications & sessions tab.
Adding Custom Fields
You can easily add custom fields to your Assembla integration:
- Use the Customize Bug Tracker Fields Option:
- Click the Customize bug tracker fields button.
- Select the fields you wish to add.
- For each field, you can click Get field values from tracker to automatically retrieve the necessary information instead of entering it manually.
- Manual Method (if necessary):
- Go to the New Ticket page in your Assembla account.
- Right-click and select View source to find your custom fields.
- Enter the name of your field in the Add bug tracker custom fields window in Testuff, using the same name as in the code field.
Associating a Custom Assembla Space with a Testuff Project
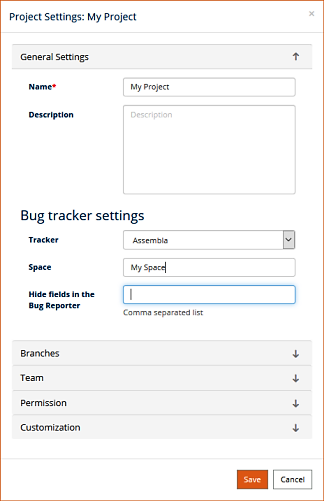
To link a specific Testuff project with a custom Assembla space, follow these steps:
- Select a Testuff Project:
- In Testuff, go to Settings and choose the Projects menu option.
- Select the project by clicking on the Edit link next to it.
- Configure the Bug Tracker:
- Under the General Settings section, ensure the Tracker field is set for Assembla.
- Enter the relevant Assembla space for this Testuff project.
- Save Your Settings: Click the SAVE button to apply the changes.
Note for Desktop Client Users: The process is similar, but you may need to navigate differently, such as using the “Manage projects” link from the home screen.
Please contact us for any help integrating Testuff with your Assembla.