
 GitHub Website
 GitHub Website
How to Integrate Testuff with GitHub
Testuff can automatically send every reported defect to your GitHub account, allowing you to continue using GitHub for bug tracking while running your manual tests in Testuff.
Configuring Testuff for GitHub
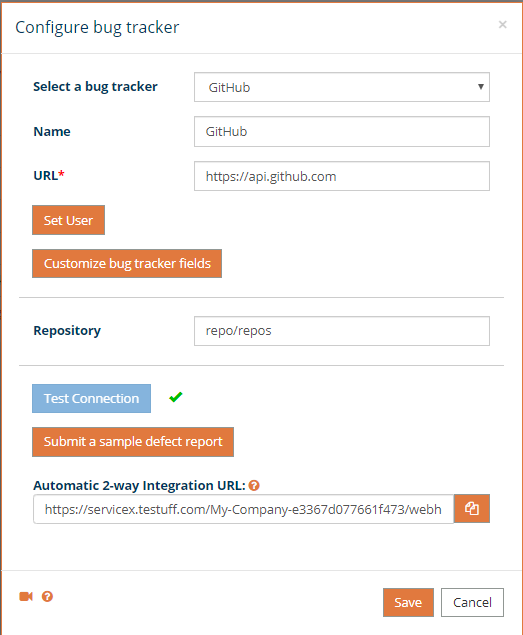
Follow these steps to set up the integration between Testuff and GitHub:
- Access Bug Tracker Settings:
- Go to Settings in Testuff.
- Select Bug Trackers.
- Click on the Add Bug Tracker link.
- Select GitHub:
- From the bug tracker dropdown, choose GitHub.
- Enter the GitHub URL:
- For cloud-hosted GitHub, use
https://api.github.com. - For a locally hosted GitHub, use a URL like
https://my-domain.com/api/v3.
- For cloud-hosted GitHub, use
- Set the Default Repository. Any defects exported from Testuff projects without a custom GitHub repository will use this default repository.
- Set User Token: Click Set User to enter your GitHub token.
- Test Connection:
- Click the Test connection link to verify the setup.
- Optionally, click Submit sample to ensure Testuff can create bug reports in GitHub. A new bug report should appear if the setup is successful.
- Don’t forget to click OK to save the settings.
Creating Your GitHub Token
To create a personal access token in GitHub:
- Access Token Settings:
- On any GitHub page, click your profile icon and select Settings.
- In the sidebar, click Developer settings.
- Generate a Token:
- Click Personal access tokens in the sidebar.
- Click Generate new token.
- Add a description for the token and check the “repo” permission.
- Click Generate token to complete the process.
Setting Up Automatic 2-Way Integration
Testuff offers a unique feature that automatically updates reported defects in Testuff with any changes made in GitHub. To enable this:
- Set Up Webhooks in GitHub:
- In GitHub, go to the repository you own.
- Click Settings and select Webhooks from the left-side menu.
- Add a new webhook:
- Under Payload URL, enter the URL provided in Testuff under Settings > Bug Trackers > GitHub (found under “Automatic 2-way Integration URL”).
- Set Content type to
application/json. - Optionally, use a GitHub secret ID. Enter “Testuff” as the secret word.
- Check Let me select individual events and select Issues and Issues comments.
- Complete Webhook Setup: Click Add webhook to finalize the integration.
Adding Labels to the Bug Report
To add labels to a bug report in GitHub:
- Click the Customize bug tracker fields button in Testuff.
- Click the Edit link next to Labels.
- Enter the label name(s) in the popup window, separating multiple labels with commas.
Associating a Custom GitHub Repository with a Testuff Project
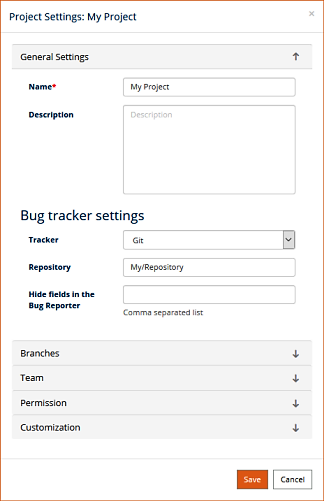
You can configure specific Testuff projects to export defects to specific GitHub repositories:
- Select a Testuff Project:
- Go to Settings and click on Projects.
- Select a project by clicking Edit next to it.
- Set the Bug Tracker:
- Under the General Settings section, ensure the Tracker field is set to GitHub.
- Enter the repository details for this Testuff project.
- Save Your Settings: Click SAVE to register the new settings.
Please contact our support team for further assistance with integrating Testuff and GitHub.