
How do I write tests in Testuff?
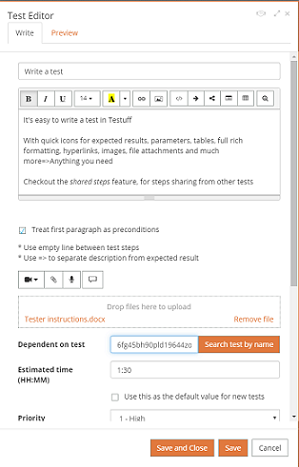
Writing tests in Testuff is straightforward. Here’s how to do it:
- Access the Tests Screen:
- By default, you’ll see a list of all previously created tests. If no tests exist, the message “No tests to show” will be displayed.
- You can filter the list by selecting a specific suite or using the Filters feature.
- Create or Edit a Test:
- To create a new test, click the Add Test button. To edit an existing test, click its name.
- Before the Test Editor loads, select the suite where the test will be located.
- Enter the test name in the top text box.
- Write the Test Steps:
- Write out the test steps, separating them with a blank line (hit Enter twice after each step). Add text formatting as needed.
- To indicate an expected result, type `=>` or click the relevant icon and write the expected result.
- Add Preconditions:
- Enter preconditions in the first lines of the test editor. Then, tick the Treat first paragraph as preconditions checkbox.
- Attach Files:
- Attach files by clicking the Attach File icon or by dragging and dropping files onto the “Drop files here to upload” bar.
- Test Preview:
- the Test Preview feature to see how the test will look before saving. Continue editing as needed.
Advanced Use
The test editor includes additional options:
- Time Management: With the Estimated Time field, you can set up your estimated execution time for the test. Testuff automatically measures test actual run time during execution for better management and planning.
- Priority: Set the priority of the test – high, normal, or low. If you don’t need to prioritize, leave it as is.
- Category, Labels: Organize tests further by setting these parameters. Note that Category values can be customized under Settings->Customization.
- Comments: Add comments to communicate with the test writer or tester.
- Disable editing a test: Use the Stage field not only for staging, but also to block editing selected tests.
Linking Files and Images
You can link steps or expected results to files and images:
- To link a file, click the Link icon, enter the text to display, and the file’s URL.
- To show an image in preconditions, steps, or expected results, click the Link icon, enter `IMAGE` in the text-to-display field, and then enter the file name (e.g., `my-image.png`).
Shared Steps and Preconditions
- Shared Steps: Use #TEST,test_id# in the Test Editor to add steps from another test. You can also share individual steps by adding the order number after the Test ID.
- Shared Preconditions: Use the same format as for shared steps. Check the precondition checkbox at the bottom of the editor.
Test Dependency
A test can be marked as dependent on another test, meaning it cannot be run unless the dependent-on test has passed. To set this up, enter the dependent-on test ID in the editor of the dependent test. You can use the Search test by name popup to find any test and its ID.
Creating tables
- You can create tables in the Testuff editor using the table icon. Select the number of columns and rows, then enter your headers and content.
- You can also paste a table from Word/Excel: Copy the table, click the table icon in the Test Editor, and approve creating the table.
Example test
Check the Sample Suite automatically created in your default project for example tests. Here’s one example:
| Test Name: | Re-saving |
| Pre-conditions: | Notepad is installed |
| Test Steps: |
Open Notepad Type in some text Save the file => File should be saved properly with the content Type in some more text Save again => No file dialog should appear => File should be saved properly with the new content |
Desktop Client-Specific Notes:
- Creating or Editing Tests: Either edit a test by double-clicking it or create a new one via the right-click menu. You can also use the ‘Add Test’ link.
- Saving Tests: Save via the link, `Ctrl+S`, save & close via `Alt+Enter`, or close without saving via `Esc`.
- Editing Shared Steps: Right-click the shared steps test ID to find the edit test link.
Desktop client Keyboard shortcuts in the test editor:
| Function | Shortcut |
|---|---|
| Select All | Ctrl+A |
| Bold | Ctrl+B |
| Underline | Ctrl+U |
| Italics | Ctrl+I |
| Links | Ctrl+K |
| Undo | Ctrl+Z |
| Redo | Ctrl+Y |
| Find & Replace | Ctrl+F |
| Go To Step | Ctrl+G |