
 YouTrack Website
 YouTrack Website
How Does Testuff Integrate with YouTrack?
Testuff, as a hosted service, can automatically send every reported defect to your YouTrack account. This allows you to manage your manual tests within Testuff while continuing to use YouTrack for bug tracking.
How Do I Configure YouTrack with Testuff?
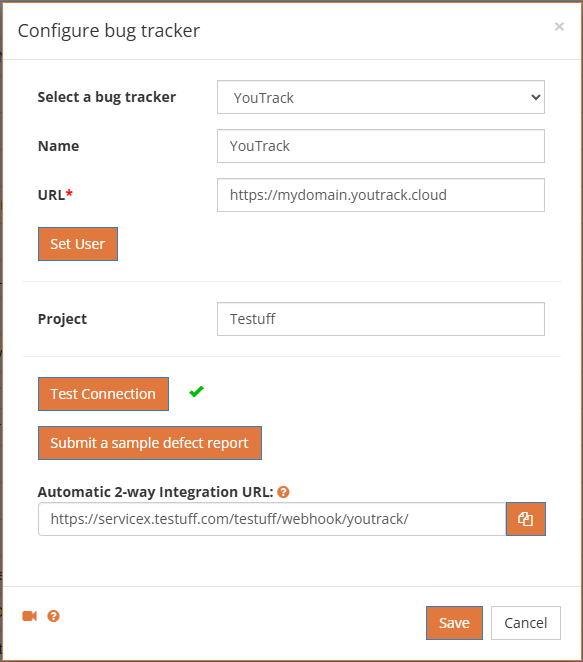
- In Testuff, go to Settings and select Bug Trackers.
- Click Add Bug Tracker and choose YouTrack from the dropdown menu.
- Enter your YouTrack server address in the URL field (e.g., https://your-youtrack.com). Only use the base URL and omit any file paths.
- Set the default Project. Testuff will export defects from any project that doesn’t have a specific YouTrack project set, using this default one.
- Set user: To create a token in your Youtrack account go to Profile->Account security in Youtrack.
- Click Submit a Sample Defect Report to verify that Testuff can create bug reports in YouTrack.
- Click Save to confirm your settings.
Setting Up Automatic 2-Way Integration
Testuff supports automatic 2-way integration, allowing updates in YouTrack to reflect in Testuff. Here’s how to set it up:
Creating a Webhook in YouTrack:
- In YouTrack, navigate to Administration and select Workflows.
- Click Create Workflow and provide a title and name for your workflow.
- Add a new On-change Module.
- Copy the following JavaScript code into the editor:
Copy to Clipboard
Setting up the Webhook
- Replace
https://serviceX.testuff.com/[CID]/webhook/youtrack/with the URL in Testuff: Settings > Bug Trackers > YouTrack (under “Automatic 2-Way Integration URL”). - Return to the Workflows screen, and tick the checkbox for the new workflow.
- Add the workflow to your relevant project(s).
You’re all set to report defects from Testuff to YouTrack and get automatic updates.
Can I Associate a Custom YouTrack Project to a Testuff Project?
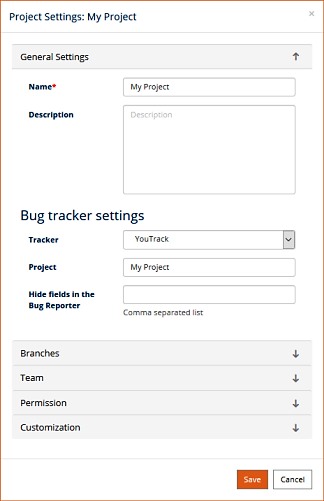
Yes, you can associate a Testuff project with a specific YouTrack project. If no custom project is set, the default one in the settings will be used.
- In Testuff, go to Settings, then click Projects.
- Select a project and click Edit.
- Ensure the Tracker field is set to YouTrack and enter the corresponding YouTrack project name.
- Click Save to confirm.
Need assistance? Contact us for help integrating Testuff with YouTrack.